Featured Post

Scrap your Summer

Join me on the Creative Scrapbooker Magazine Blog for a Scrapbook Layout...?  Oh yeah... I went all scrappy for this post.  I am sharing my NEW about to release TINBIT TRAVELS Collection with Wild Whisper!    Swing by the    Creative Scrapbooker Magazine Blog  for a full tutorial!   PIN IT   EAT. SLEEP. CRAFT. {repeat}

Altered Bike Frame- Tutorial

You bet I did a tutorial for this one.  WHY?  Because I love you...and I remembered too.  Also, these are the new Altered Metal Frames by Prima and there are not too many around for inspiration. I do like to help get you thinking how to make this stuff.  So...ME FIRST!
 
I had no clue what I was going to do.  I was hoping the weathered clock die would fit and it did!  From there I just went with it.
 
 
Let's make it easy.  I took the packaging that goes in the bike and used it as a template for the chipboard and paper backing. 
 
 
The frame is dark inside so I went with tumbled glass to brighten things up!  The paper is TH new Menagerie paper pack, 8x8. 
 
I used the new tumbled glass distress paint on the chipboard weathered clock.
 
I cut the new trellis framework die on chipboard and added new distress paint frayed burlap.
 
I added tumbled glass distress paint with a sponge to add a great vintage patina.
Prima has these fun license plates and yep, more distress paint to grunge them up. 
 
Adding the 2 colours and rubbing them off really adds that vintage feel.


Not having a clear path to follow I decided to just go with gears.  I used all my gear dies!
 
I cut all my gears with chipboard then paint with tumbled glass distress paint.

Sponge on some brushed corduroy distress paint.
For the wheel, emboss metal foil paper.  I cut the strips at 2 1/2", emboss with the gear folder.  Then use a sponge to work the black soot paint in.
 
Then rub off with a cloth or paper towel.  This will remove most of the paint while leaving the black in the grooves.  Making it look vintage.
Because it's adhesive it goes on easily.
 
While applying to the wheel slowly pull off the backing.
 

It wraps around the wheel forming to it's shape.
 
 
I need tied bows, I love tied bows, I can't help myself!
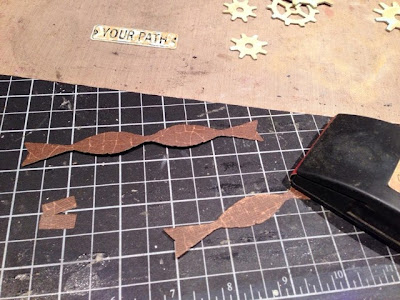
I cut the small bow on distress paper.  To help the curve, roll with a pencil.

I wanted the matchbox on the frame.  To continue the gear theme I popped the smallest M&S gear in the die and cut! 
 
 
Wrap the matchbox with some paper strips.  Add some acetate for that gear cut out and wrap your bows.
 
I poked a hole through the acetate.  Where I will add some hardware. My battery on my phone was dying and I was assembling.
 
Here's the bike frame all done.
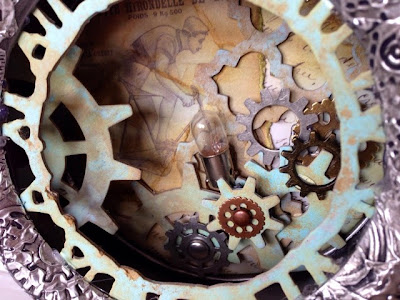
I simply layered a bunch of die cut gears and metal gears.  Layering over the trellis die.  Hot glue all your pieces and layer!
I love the bike rider cut from the Menagerie paper pack.  I tucked the light bulb in there for a vintage touch.
 

Creating dimension by layering really makes for a great piece.
 
Here's that matchbox.  I hot glued die cut gears and metal together spilling out of the upright matchbox.
 
These little tied bows are awesome and there's that metal gear attached to the acetate.  I added the license plate along the front so it wouldn't be missed in the bike wheel.
All the gears spilling out.
 
I combined more gears for the rear tire and glued.
 
 
Along the bottom of the frame I cut chipboard with the gadget gears on the edge die and attached.
 
 
I hung all these Idea-Ology bits to the handle bars and seat.

 
 That front tire looks pretty badass in metal!
 Keeping with the bike theme of the frame really helped me pull together this frame.  Sticking with gears and using them throughout creates a vintage steam punk bike.
 
I've just squeezed this in for the SSS Monday Challenge, D is for Distressed!
 
  Thanks for looking and commenting if you do.  Hope this gives you an idea of what to do when you come across something cool like the Prima Altered Metal Bike Frame.

Comments

  1. This is SOOOOO FREAKING AWESOME!!! OMG the embossed foil wrap is blowing my mind!!! You NAILED this one Nicole!!!

    ReplyDelete
  2. I have never seen this frame, it is so cool.
    But even cooler with your touch.
    I love the front tire!!!
    Also when in doubt add gears ;)

    ReplyDelete
  3. WOw, this is amazing!! Love that bike frame and your use of dies here is fabulous. How great that the clock fit so well, and I love all those gears. Thank you so much for sharing with us at Simon Says Stamp Monday Challenge Blog!

    ReplyDelete
  4. Wow, this is absolutely amazing, Nicole! There are so many fabulous elements included that I'm still gazing in awe. Thanks for sharing the tutorial as well!

    ReplyDelete
  5. Absolutely grungy awesome!!! Love all the little details!!!

    ReplyDelete
  6. Wow!!! Totally awesome alteration Nicole...so inspiring...love this !!!!

    THank You so much for sharing the tutorial

    CRafty Hugs Annie x

    ReplyDelete
  7. What a fabulous alteration on this precious bike! Love the embossed metal on the outside and the green! Fabulous!

    ReplyDelete
  8. What a "fantastical" project! I love how steampunk it is! Wonderful job! Never would have guessed you used embossed foil paper!

    ReplyDelete
  9. Nicole your creativity is totally amazing! LOve this piece!!!!! One word: STUNNING!!!!!!!!!!!!!!!!! THanks so much for joining us on Simon Says Stamp Monday Challenge! BArbarayaya

    ReplyDelete
  10. I dont even know how I wound up here on your blog but WOW. What an incredible vision and creation!! This is absolutely fantabulous! I like it so much I am going to pin it on my THings I Love Board on Pinterest - I think it deserves all the praise and admiration from the Pin world too.

    ReplyDelete
  11. This is totally awesome. I love the steampunk theme, goes perfectly with the bike wheel. I am inspired now to make one of these for myself. TFS

    ReplyDelete
  12. Wow! This is just soooo brilliant! Can't stop looking at it! Loads of brilliant colours and layers! A stunning make! Thanks for sharing the how to as well!

    Hugs,
    Claudia x

    ReplyDelete
  13. OMG! I saw the bicycle at my LSS a and thought I would like to play with it. Yours is so amazing! Love steampunk and you nailed it! I am inspired! Thanks for sharing your amazing talent.

    ReplyDelete

Post a Comment

My heartfelt thanks for stopping by.

Popular Posts