I was sitting around doing pretty much nothing.
Oh wait...I was wishing I was doing nothing!
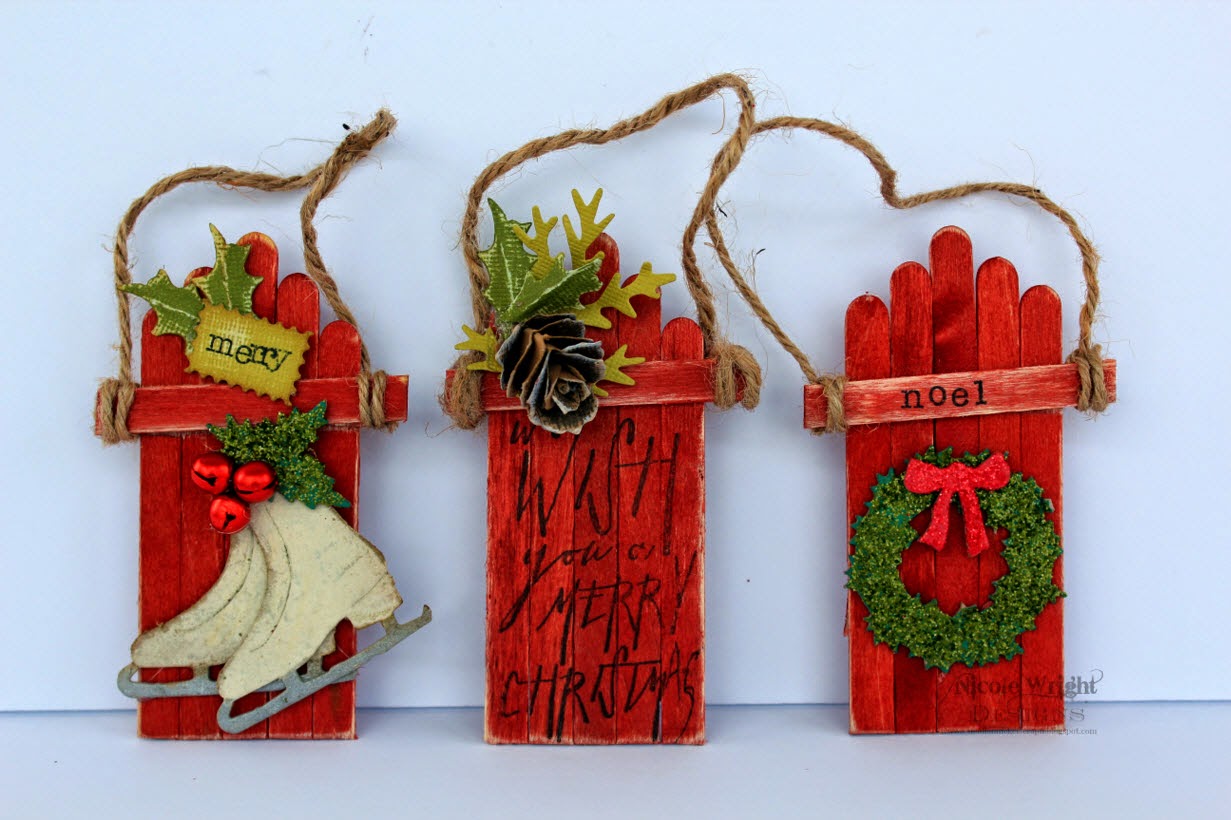
I was slacking off... (for a moment while I was removing hot glue from my fingers to relieve the burning) scrolling through Pinterest this morning. I came across the CUT-EST pin (right here) and I knew I had to make some. Off to the $1 Store for a pack of popsicle sticks (100 for $1) and some Jute Twine for $1. I love this idea so I went with and made them my own.
I'll show you quickly how I did it.
You'll need some stain, Jute, good scissors, hot glue and 9 popsicle sticks per sleigh. Then some goodies to embellish.
You'll cut 1 popsicle stick in half for the bottom of the sleigh. This secures it.
I lined 5 popsicle sticks up each off set like you see here. Then you can hot glue your pieces you just cut. You're going to trim the bottom so glue the cut popsicle above the shortest stick or the middle one.
Flip over and trim the over hang.
Trim the bottom of the sleigh. I cut just above the center (or shortest) stick.
Take 2 popsicle sticks and trim about 1/2" from the ends on an angle to make the "sleigh blades".
I glued to the edges along the first popsicle stick line.
Place your final stick along the top of your sleigh. I did mine at slight angle.
Then trim leaving a little over hang. I left roughly the width of the stick on each end. This is where you'll tie it off for hanging.
I used fired brick distress stain to ink my sleighs.
Once dried I sanded the edges.
My youngest son made me this awesome sanding block. I just love it!
Now to create the hanging part...a little jute twine.
I tied a double knot to the back. I glued a little hot glue on the stick and beside the knot to secure. With the extra jute left over I wrapped around and attached the end to the glue and trimmed.
Decorate how you like. I went a little further and added some die cuts. The mini ice skates, mini holy leaf, thinlits label, St. Nick holly lead and some tiny jingles for berries.
I stamped the Merry using tiny stamps I got at Michaels from the $1.50 bin.
I stamped onto the sleigh from the Handwritten Holiday stamp set. My Mini stamp set isn't here yet, I would have used those. Then I attached a tattered pinecone with some mini holly leaves.
Again using the wee letters I stamped NOEL. Then I distress glittered the mini wreath and bow.
I lightly sprayed the back. You won't see it. But I wanted it to have some color.
Oh and 100 popsicle sticks gets you 10 sleighs.
They are so fast to make that I decided to make them all. I will use them if I need the rest and color accordingly. These would make great gift to give out or keep for your tree.
Thank you for checking this tutorial out. If you make any PLEASE be sure to share with me on my
Facebook page.
I'll be sharing this over at


Awesome as usual Nicole!!!!!!!!!!
ReplyDeleteThese are beautiful but then again, everything you make is beautiful.
ReplyDeleteThanks for sharing!
Hugs,
Darlene ♡
As always very creative. Love the concept. I like the skates on the sleigh and the details. Gorgeous Xmas ornament or even a decoration to be used in other areas. xx
ReplyDeleteThese are adorable.
ReplyDeleteI remember making these with the kids when they were young…but you sure upped the craftiness of these didn't you :)
WOW They are great. Thanks for sharing!
ReplyDeleteGreetings Silvia
Love these sweet sleds!
ReplyDeleteSuch a fantastic idea Nicole and the results you achieved are beautiful! Anne xx
ReplyDeleteOh my goodness.......absolutely the most wonderful and precious ornaments ever! I just love these :)
ReplyDeleteFab U lous!!!!
ReplyDeleteWOW, what a wonderful idea! I LOVE everyone of them!!! Thanks so much for sharing with us at Inspiration Emporium! Bobbi xx
ReplyDeleteAbsolutely the coolest - brilliant make, Nicole!
ReplyDeleteOMG these are stinkin' adorable!!!
ReplyDelete