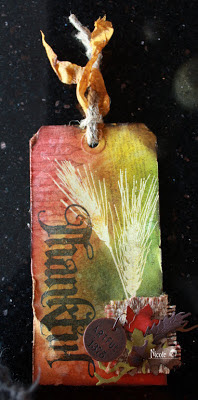
I've had my tag's wheat stamped for a week! Thanks to my crafty BBF for letting me borrow it. I admit, it's strange to create a "fall" tag such as this after we've already celebrated Thanksgiving. But I'm happy to have made it. I even picked up the big stamp (Thankful) for it. How could I not, it was 70% off;)
I only have 3 distress stains and they apply more to winter. The blotted look isn't as prevalent however we'll still get there. So, here is my solution...
Use whatever inks you have on hand, stamp them on your craft mat (don't have one GET ONE) and mist away with your mister. Don't worry about overlapping the inks. You want this.
Drag your tag through the wet inks until you have the look you want. It's messy...
Add more ink if you need. It's OK if it gets in the water puddles a bit. I found I wanted more green.
Here's my tag without the distress stains all dry. Don't forget to stamp and flick water to make it blotchy. I finished my tag then remembered I missed stamping. So, I added it at the end.
Now for the leafy bits...I used my scraps for this, cut strips 2"x12". If the paper is textured, place that side down. I always forget that part and have to re cut. I picked up my die on sale last year.
Look at it all! PRETTYYYYY....
Now that all your leafy bits are inked, place the extras in a bag or container. Then you'll be ready for the next time.
I buy my rice specifically for the burlap bags so I can craft with them.
Cut off a small square, about 2"x2" and pull off a couple of the strands so it's frayed. My poor fingers and nails are ink stained! Ahhh life of a craft genius!
Now you can just layer away.
Can't even tell that burlap is a rice bag!
I went back over with my inks and it made the tag super rich with colour.
If you don't have all the stuff make do with what you do have. Makes it more of a challenge and this is my favorite way to craft. And watch for those sales at your LSS. I get all my dies, 40%, 50%, 70% off. I may not have them when they first come out, but being patient means I save a lot!


Beautiful tag! Wonderful job
ReplyDeleteOh my that turned out great.. take care
ReplyDeleteWOW Nicole you have been busy! Love all your Tim Inspired tags!
ReplyDeleteI think it's beautiful and I agree, patience is a virtue! I do love the large Thankful though and the wheat stamp....
ReplyDeleteLovely tag! Love that you use what you have, and bargains as well!
ReplyDeleteI just might have to search out that die!
lovely ! Love that you use what you have, with great results!
ReplyDeleteHmm I might have to search out for that die..... :)
Thanks for reminding me of this distress stain technique! I still need to try it.
ReplyDeleteCONGRATS on winning for November!! YEAH!! Your tag is BEAUTIFUL!! THANKS for sharing and have a FABULOUS WEEKEND!! =)
ReplyDeleteCongrats! Just came from Tim Holtz blog and your name was listed as a winner of 12 Tags of 2012 Nov.
ReplyDeleteMelissa
"Sunshine HoneyBee"
Your tag turned out beautifully - great tutorial as well :) Congrats on winning November's challenge!
ReplyDeleteCheck out tim's blog girl!! :D
ReplyDeleteGreat step-by-step photos. Your tag is lovely. Congrats on the shout-out from TH!
ReplyDeleteCongratulations on being one of the winners.
ReplyDeleteHey Canadian crafter! Fab tag and fab tutorial! Congrats on your win!
ReplyDelete