Holiday Cheer before Halloween? I'm sorry...
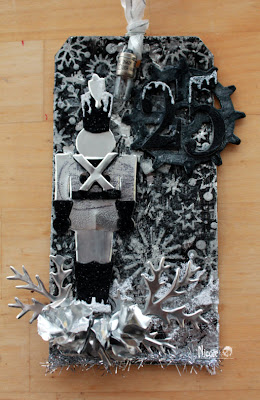
Lets just say when I was done making this tag I was wondering how the heck I got there! Sometimes it just happens that way. I was looking for inspiration for the new Tim Holtz Toy Soldier die and I really wasn't finding much yet. So, I am on my own for this one.
Using spray adhesive, adhere tin foil to tag size 8, then run through an embossing folder of your choice. Trim the edges, then paint black. Once dry, sand lightly to expose the foil. I stamped Versamark and clear embossed to seal.
A little silver wire goes along way when attaching my wee light. Attach to your ribbon.
Cut on grunge Mover and Shapers 25, paint black and add a thick layer of Rock Candy for crackle. Then again with grunge I cut the middle gear from my die, apply 2 layers of silver embossing powder, sand edges and add some black distress ink. Mount the 25 with hot glue, then white glitter glue for icicles.
Oh how I have a love/ hate with the Tattered Pine cone die. I love the end result but DISLIKE the the process. I have on hand pieces of those oven trays. This is what my cones are made of. Pain to make but DO I LOVE THESE! Not your average pine cone I'm thinking...
The Toy Soldier is again cut with the oven sheet and sparkly black felt. The texture on his "coat" section is a past mistake. A stamped a light bulb, little clear embossing powder and you have texture. You can just kinda see the bulb.
I almost don't want to give this away! I think I will make more in various colours. Stay tuned!
So do you like? I'm really excited to hear your thoughts and PLEASE share any suggestions of something you'd like to see when I make these again!


It is lovely the way it is.. but you will figure out a different way of making.. love it.. I was thinking of using some Alcohol Ink on your metal pieces could add another totally different look again.. take care
ReplyDeleteWow...like one of your check blocks says "Freakin Awesome" love it..you have inspired me..gorgeous..you have out done yourself..LOVE..Love...love it...Nichole..thanks for always inspiring and sharing
ReplyDeleteWow! So awesome!
ReplyDeleteLove the black and silver! Cool use for the oven tins - soo much better (and sturdier) than the heavy duty aluminum I've been working with! Would not have thought of for Christmas, but is going to be awesome for some 'gothy' kind of people in my family.
ReplyDeleteIf you don't mind me 'borrowing' the idea!?
Fabulous. Love the soldier and the silver.
ReplyDeleteBe blessed, Beckie
Stampin' Up Ind Demo
http://justbcreativecrazy.blogspot.com
OMGosh.... AWESOME!!!
ReplyDeleteLove it!!! Makes me want to dig out pie tins and PLAY!!
ReplyDeleteLike your TH Tin Soldier tag. I bought the die this wk and have not used it yet. You've inspired me. Went to a make & take recently and stamp owner showed us how to make the Pinecone. The right amt of hot glue and going slow I think it the key. I tend to not put enough hot glue & go to fast and end up tearing and having to hot glue where it tears. I also bought TH: Stocking & Tattered Poinsettias.
ReplyDeleteMelissa
"Sunshine HoneyBee"